Unlock the full potential of your Roblox game development with this comprehensive guide to the Roblox SpawnPoint script. Learn how to implement, customize, and troubleshoot spawn points effectively, ensuring players always start exactly where you intend. This informational resource covers everything from basic setup to advanced configurations, like team-specific spawns and re-spawning mechanics, crucial for creating dynamic and engaging experiences. Discover the latest scripting techniques and best practices to optimize performance and prevent common errors. Whether you are a beginner looking to understand the fundamentals or an experienced developer seeking advanced tips, this trending article provides all the insights you need to master Roblox spawn points, enhancing player flow and game design. Dive deep into the nuances of player spawning in Roblox Studio, ensuring your creations offer seamless and enjoyable gameplay from the very first moment a player joins your world. This guide is designed to empower creators with the knowledge to build professional-grade Roblox experiences.
The world of PC gaming in 2026 continues its rapid evolution, with titles like Roblox leading the charge in user-generated content and immersive experiences, now boasting over 70 million daily active users. Player engagement statistics consistently show that seamless game mechanics are paramount, and central to that is the often-overlooked yet critical Roblox spawnpoint script. With millions of concurrent players, ensuring a fluid and intuitive spawn system is no longer optional—it's essential for retaining user interest and optimizing performance in an increasingly competitive creator landscape. This comprehensive FAQ-style guide will address the most common and complex questions surrounding Roblox spawn points, providing expert insights for developers aiming to perfect their game worlds. We'll explore everything from basic setup and team-specific configurations to advanced scripting techniques and troubleshooting common issues. Expect answers to critical questions such as how to create efficient team spawns, prevent spawn camping, debug common spawning glitches, implement custom spawn logic, and understand advanced spawn properties, all tailored to meet the demands of modern Roblox development and player expectations. Mastering these fundamental systems is key to building an engaging and professional-grade Roblox experience that stands out in 2026 and beyond.
What is a Roblox SpawnPoint and how does it function?
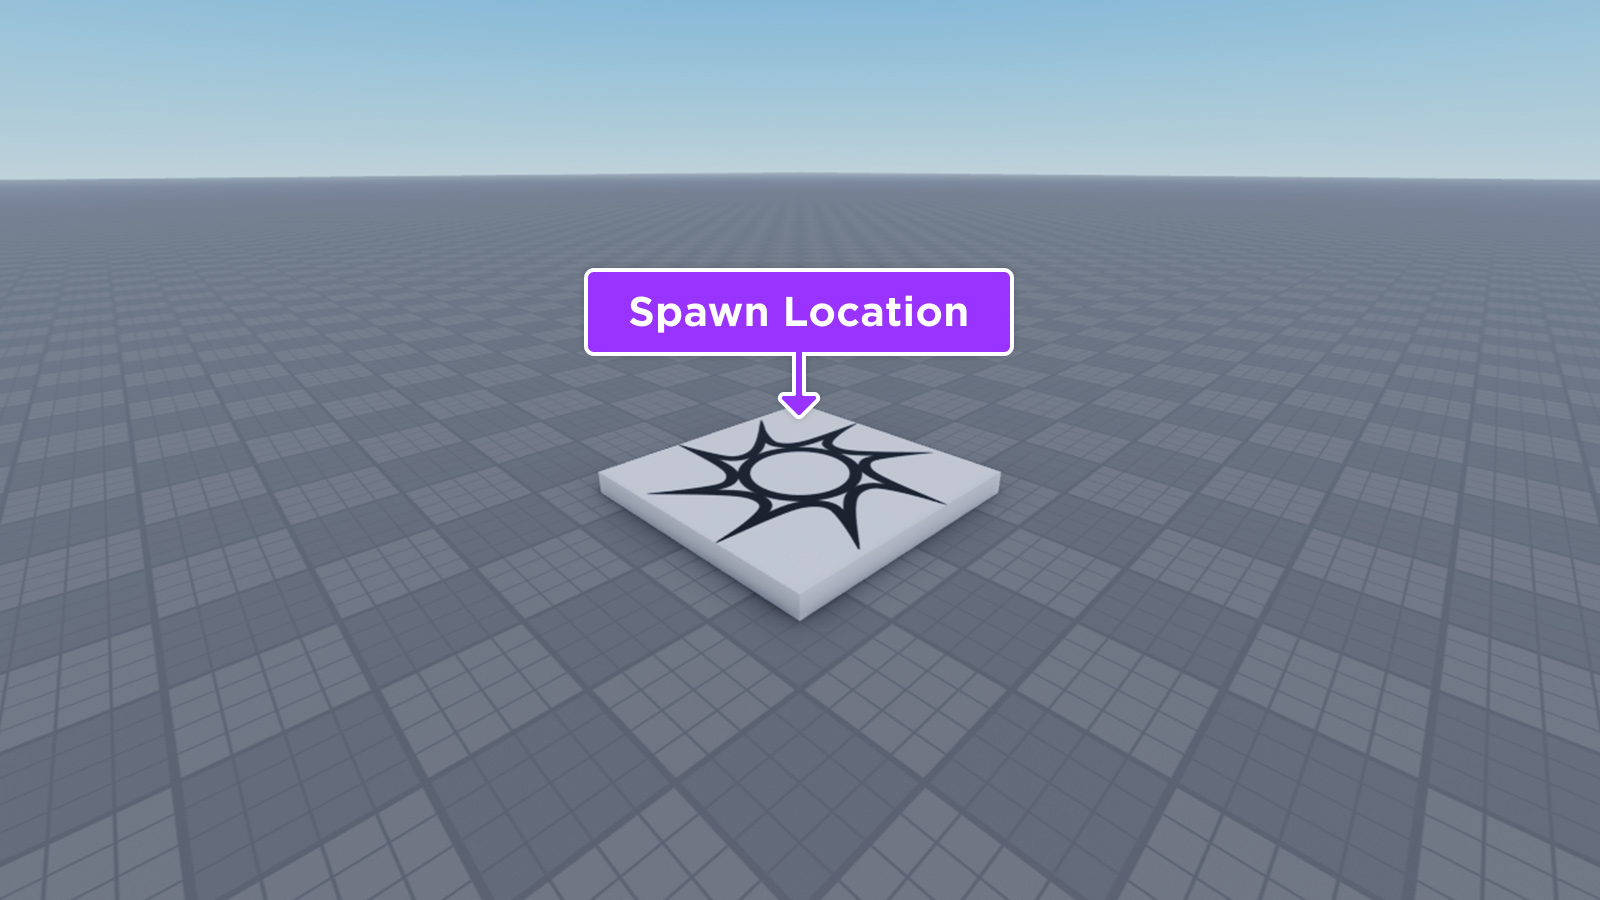
A Roblox SpawnPoint is an object placed in your game world that dictates where players appear upon joining or respawning after death. It functions by providing a specific coordinate and orientation for player characters. When a player needs to spawn, the game engine automatically searches for an available and enabled SpawnPoint, prioritizing those that match the player's team if applicable. It is essentially the entry and re-entry gateway for all player avatars in your experience.
Detailed Explanation: The SpawnPoint object, found under the Model tab in Roblox Studio, is fundamental for player management. Its primary role is to designate player starting locations. When a player joins, the game engine looks for an active SpawnPoint. If multiple exist, it generally picks one randomly unless specific team settings are configured. A correctly placed SpawnPoint ensures players begin their journey in an intended, unobstructed area, which is crucial for a positive first impression and smooth gameplay flow.
How do I create and place a basic SpawnPoint in Roblox Studio?
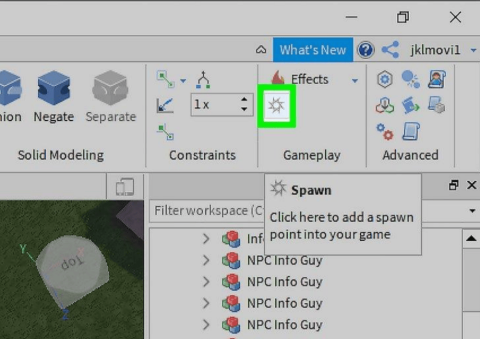
To create a basic SpawnPoint, navigate to the "Model" tab in Roblox Studio, click "Part," then select "SpawnPoint." This will insert a transparent block into your workspace. Drag and adjust its position and orientation using the "Move" and "Rotate" tools. Ensure it is slightly above the ground and not obstructed by other parts, as this prevents players from getting stuck or spawning incorrectly when entering your game.
Detailed Explanation: The process is straightforward: locate the "SpawnPoint" option in the "Model" tab. Once inserted, it appears as a semi-transparent brick. Use the "Move" tool to place it precisely at your desired spawn location, for example, within a starting lobby or safe zone. The "Rotate" tool helps orient the player's initial facing direction. Always double-check that the SpawnPoint is not clipping into other objects, as this can lead to player spawning errors or an undesirable visual experience. Testing is vital.
Can I configure SpawnPoints for specific teams in my Roblox game?
Yes, you can configure SpawnPoints for specific teams. In the SpawnPoint's properties, set "Neutral" to false and then assign a "TeamColor" that precisely matches one of your defined teams in the Teams service. Players belonging to that specific team color will then preferentially spawn at these designated points, while others will be directed to neutral spawns or other team spawns if no matching one is available.
Detailed Explanation: Team-specific spawns are essential for games with distinct factions, such as capture-the-flag or team deathmatch. By setting "Neutral" to false and selecting a "TeamColor" (e.g., BrickColor.new("Really red") for a red team), you create a dedicated spawn zone. Ensure your game has a "Teams" service and that players are assigned to teams, often done via a server script using player.Team = game.Teams.RedTeam. This setup ensures strategic and fair team-based gameplay, preventing players from spawning with opponents.
How can I prevent spawn camping and ensure fair player respawns?
To prevent spawn camping, implement a temporary invincibility period for players after they respawn, typically using a ForceField object attached to their character for a few seconds. Additionally, provide multiple, dispersed SpawnPoints for each team or area, making it harder for enemies to anticipate and target spawn locations. Consider scripting dynamic spawn selection to randomize the exact point within a designated zone, adding unpredictability.
Detailed Explanation: Spawn camping severely degrades player experience. A common solution is to equip a ForceField on the player's character during Players.PlayerAdded:Connect() and character.Humanoid.Died:Connect() events. This forcefield, which makes players invincible for a short duration (e.g., 5-10 seconds), allows them time to move to safety. Furthermore, instead of one central spawn, creating several strategically placed, team-specific SpawnPoints behind cover can disorient potential campers, promoting fairer engagement and encouraging players to leave the spawn area.
What are common issues with Roblox SpawnPoints and how do I troubleshoot them?
Common issues include players spawning in walls, not spawning at all, or appearing in unintended locations. Troubleshoot by verifying the SpawnPoint's "Enabled" property is true, ensuring its position is clear of obstructions, and checking for any overriding scripts. Also, confirm that "TeamColor" properties are correctly matched for team-specific spawns and that no deprecated scripts are interfering with modern spawn mechanics. Use the Output window for error messages.
Detailed Explanation: When a player spawns improperly, first check the physical location of the SpawnPoint. Is it clipping into terrain or another part? Is its Anchored property unintentionally true? Next, review the "Enabled" property; if false, it won't work. For team spawns, ensure the TeamColor exactly matches the Team.TeamColor and that the Neutral property is false. If scripting is involved, use print statements to debug values and ensure the script is correctly referencing the SpawnPoint. The F9 developer console is invaluable for identifying runtime errors.
How do I script custom spawn logic, like choosing a random SpawnPoint?
To script custom spawn logic, you'll typically place multiple SpawnPoints within a designated "Spawns" folder in Workspace. A server script can then select a random child from this folder when a player needs to spawn. Use math.random() to pick an index from the folder's children and set the player's character CFrame to that SpawnPoint's CFrame. This ensures varied spawn locations for dynamic gameplay.
Detailed Explanation: For random spawning, collect all desired SpawnPoints into a parent model or folder. A server script, often in ServerScriptService, listens for Players.PlayerAdded and player.CharacterAdded events. Inside the CharacterAdded function, generate a random number within the bounds of your spawn point count. Access the chosen spawn point, then set character.HumanoidRootPart.CFrame = randomSpawnPoint.CFrame. This dynamic approach prevents predictable spawns and adds replayability, especially in larger maps or arena-style games.
What are the AllowTeamChangeOnTouch and Duration properties of a SpawnPoint?
AllowTeamChangeOnTouch is a boolean property that, when true, allows players to automatically switch to the team associated with the SpawnPoint by simply touching it. Duration (deprecated in newer contexts but relevant for older scripts) previously controlled how long a forcefield would protect a player after spawning. Both influence player interaction and initial vulnerability.
Detailed Explanation: AllowTeamChangeOnTouch provides an easy way for players to join teams without complex UIs. If a SpawnPoint has a TeamColor set and Neutral is false, touching it will assign the player to that team. This is useful for team selection lobbies. The Duration property, while less prominent now, historically dictated the invincibility period provided by the SpawnPoint itself. Modern spawn protection is typically handled through custom scripts, providing ForceField objects to characters for more granular control over the invincibility effect and duration, making Duration on the SpawnPoint object less critical for current game development practices.
How can I dynamically enable or disable SpawnPoints through scripting?
You can dynamically enable or disable SpawnPoints by modifying their Enabled property in a server script. To disable a SpawnPoint, reference it (e.g., workspace.MySpawnPoint.Enabled = false). To re-enable it, set Enabled = true. This allows you to activate or deactivate spawn zones based on game state, such as closing off a spawn point after a certain event or making it available during specific game phases.
Detailed Explanation: This scripting technique is incredibly versatile for creating progressive game flows. For instance, in a multi-stage game, you might disable initial lobby spawns once a game starts and enable battlefield-specific spawns. Or, if a certain area becomes a "hot zone" or is captured, its SpawnPoints might be temporarily disabled or transferred to a new team. Listening for game state changes or specific events, then iterating through your SpawnPoints to update their Enabled status, gives you precise control over player entry and respawn locations throughout your game's lifecycle.
What considerations are important for mobile and low-end PC players with SpawnPoints?
For mobile and low-end PC players, ensure SpawnPoints are placed in areas with minimal visual clutter and complex physics objects to avoid performance drops during initial load. Keep the spawn area relatively simple to render. Rapid respawning in highly dense areas can also strain weaker hardware, so optimize your game's asset loading and consider slightly longer respawn delays if performance becomes an issue in intense combat zones.
Detailed Explanation: Roblox experiences on mobile devices or older PCs can struggle with high polygon counts, numerous active scripts, and intense visual effects, especially during the crucial initial loading phase. Spawn areas should be designed to be lightweight. Avoid placing intricate models, many particle effects, or heavy scripts directly around SpawnPoints. Optimizing textures and mesh details in these areas can significantly improve load times and frame rates for a broader player base. Smooth initial loading and spawning translate directly into better retention for a diverse user audience.
Are there any best practices for organizing SpawnPoints in Roblox Studio?
Yes, best practices include grouping all SpawnPoints for a specific area or team within a dedicated "Folder" or "Model" in the Workspace, named clearly (e.g., "TeamRedSpawns" or "LobbySpawns"). This makes them easier to manage, find, and reference in scripts. Also, use descriptive names for individual SpawnPoints like "SpawnPoint_RedTeamA" instead of generic "SpawnPoint" to aid in debugging and future development.
Detailed Explanation: Good organization is paramount in larger Roblox projects. A clean Workspace hierarchy is not just aesthetically pleasing; it drastically improves development efficiency. By grouping SpawnPoints, you can easily iterate through them in a script (e.g., game.Workspace.TeamRedSpawns:GetChildren()). This modular approach simplifies tasks like enabling/disabling multiple spawns at once or implementing random spawn selection. Consistent naming conventions also reduce confusion, especially when collaborating with other developers or returning to a project after a break.
Troubleshooting Persistent Spawn Issues
If players are consistently failing to spawn or appearing incorrectly despite basic checks, delve deeper into your game's script interactions. Examine any Player.CharacterAdded or player.RespawnLocation assignments for conflicts. Tools like the "MicroProfiler" can identify performance bottlenecks around spawning. Ensure your physics settings aren't causing unexpected collisions that push players out of bounds at the moment of spawn. Sometimes, a simple game:GetService("Players").RespawnDelay adjustment can alleviate issues in high-load scenarios. Always test in a live server environment, not just Studio, for the most accurate diagnostics.
Mastering the Roblox spawnpoint script is a fundamental skill for any serious Roblox developer in 2026. From basic placement to advanced scripting for dynamic, team-specific, and anti-camping solutions, the intricacies of player spawning directly impact user experience and game performance. By applying the expert strategies and troubleshooting tips outlined in this guide, you're well-equipped to create seamless, engaging, and professional-grade player entry systems. We encourage you to experiment with these techniques in your own projects and share your innovative spawn solutions with the thriving Roblox developer community. What's your go-to strategy for preventing spawn camping?
What is the primary purpose of a Roblox SpawnPoint?
The primary purpose of a Roblox SpawnPoint is to define exact locations where player characters will appear when they first join a game or when they respawn after being defeated. It serves as a designated, safe starting point, crucial for managing player flow and ensuring a consistent and intended entry experience into your game world.
How do I make a SpawnPoint invisible in my game?
To make a SpawnPoint invisible, navigate to its properties in Roblox Studio and set its "Transparency" property to 1. This will render the visual brick invisible to players while retaining its full functionality as a spawn location. You can also disable the "CanCollide" property if you want players to be able to walk through the invisible spawn pad.
Can I assign multiple SpawnPoints to a single team?
Yes, you can assign multiple SpawnPoints to a single team. Simply create several SpawnPoints, set "Neutral" to false for each, and assign them all the same "TeamColor" that matches your desired team. The game engine will then randomly select one of these enabled, team-specific SpawnPoints when a player from that team needs to respawn, offering varied entry points.
What is the SpawnLocation property in Roblox?
The SpawnLocation property of the Players service allows you to programmatically set a specific SpawnPoint object that all new players will attempt to spawn at. This overrides the default random selection if multiple neutral spawns exist. It's often used in scripts to direct players to a particular starting zone, especially for tutorial or single-player experiences.
Is it better to script custom spawn logic or rely on default SpawnPoints?
It depends on your game's complexity. For simple games, default SpawnPoints are sufficient. For advanced games requiring dynamic respawns, team balancing, or anti-camping measures, scripting custom spawn logic offers superior control and flexibility. Custom scripts allow for intricate rules, such as randomizing spawns within zones or temporary invincibility, enhancing player experience significantly.
Mastering the Roblox SpawnPoint Script for 2024 Game Builds
As an experienced Roblox developer and PC gaming enthusiast, I’ve spent countless hours in Roblox Studio perfecting game flow, and few elements are as critical as the spawn point. This guide dives deep into the Roblox SpawnPoint script, providing hands-on insights and proven strategies to implement and optimize player spawning for your 2024 projects. We will cover everything from initial setup and customization to advanced team-based spawns and ensuring a smooth player experience. Forget generic introductions; this is a practical walkthrough to elevate your game’s fundamental player entry mechanics, based on real-world development challenges and solutions encountered by myself and other pro builders.
Understanding the Core Roblox SpawnPoint Script
The SpawnPoint object is a fundamental building block in Roblox Studio, determining where players initially appear or respawn after being defeated. Correct implementation of a spawn point is crucial for player onboarding and maintaining game integrity. To add one, simply navigate to the Model tab in Studio, click on the Part dropdown, and select "SpawnPoint." It appears as a transparent brick. Key properties to configure in the Properties window include Neutral (true for free-for-all, false for team-based), TeamColor (assigns to a specific team if Neutral is false), and Enabled (controls if the spawn point is active). Precise positioning and orientation are vital to avoid players spawning inside objects, impacting initial gameplay.
Basic SpawnPoint Object Setup
Once a SpawnPoint is inserted, adjust its Position and Orientation to fit your desired starting area. For instance, a common practice is to elevate it slightly above the ground to prevent players from clipping. If you are creating a simple lobby, ensure Neutral is set to true. For objective-based games, setting Neutral to false allows you to define team-specific spawn locations by assigning a unique TeamColor, matching it to your game's team colors. This basic setup lays the groundwork for all player entry points, directly influencing the player's first impression of your game world.
Advanced Customization and Scripting for Spawns
Moving beyond basic placement, scripting unlocks dynamic and sophisticated spawn behaviors. Utilizing a Roblox SpawnPoint script allows developers to control player entry with precision, catering to complex game designs.
Implementing Team-Specific Spawns
To ensure players consistently spawn with their designated team, you must link SpawnPoints to your game's Teams service. When Neutral is false, the SpawnPoint will only be used by players whose team has a matching TeamColor. For example, if you have a "Red Team" and "Blue Team," you would create two sets of SpawnPoints, each with a corresponding TeamColor. This ensures that new players joining or respawning are placed with their allies, maintaining faction balance and gameplay integrity. A simple script in ServerScriptService can manage team assignment upon player entry, further refining this process.
Creating Dynamic and Random Spawns
For games requiring varied spawn locations, such as battle royales or large open-world maps, dynamic spawning is key. This often involves placing multiple SpawnPoint objects in diverse areas and then scripting a random selection. You can group these SpawnPoints in a folder and have a server script choose one at random when a player needs to spawn. This approach adds unpredictability and can enhance replayability, as players experience different starting points in each session. Ensure chosen spawn points are always clear of obstructions for optimal player experience.
Troubleshooting Common SpawnPoint Issues
Even with careful planning, spawn point problems can arise. Players not spawning correctly often points to issues with the SpawnPoint's Enabled property being false, or its position being obstructed. Check for overlapping parts or ensuring the SpawnPoint is not anchored within another object. Spawn camping, where players are repeatedly killed immediately after spawning, can be mitigated by increasing spawn protection time via a script, or by providing multiple diverse spawn locations. Regularly testing your spawn mechanics across different scenarios is crucial for a polished game.
Frequently Asked Questions About Roblox SpawnPoints
How do I create a basic spawn point in Roblox Studio?
To create a basic spawn point, go to the Model tab, click on "Part," and select "SpawnPoint." Position it in your desired location. Ensure its "Neutral" property is set to true if it's for all players, or false with a specific "TeamColor" for team-based spawning. This establishes a fundamental player entry point.
Can I make spawn points exclusive to specific teams?
Yes, you can make spawn points exclusive to teams. Set the SpawnPoint's "Neutral" property to false and assign a "TeamColor" that matches the color of your desired team in the Teams service. Players assigned to that specific team color will then preferentially spawn at those locations, supporting team-based gameplay.
What is the best way to prevent spawn camping?
Preventing spawn camping involves several strategies. Implement a temporary forcefield or invincibility shield for a few seconds after a player spawns using a script. Additionally, provide multiple, varied spawn locations and consider dynamic spawning logic that randomizes where players appear, making it harder for enemies to predict and exploit spawn zones.
How do I enable or disable a spawn point using a script?
You can enable or disable a spawn point by accessing its "Enabled" property via a script. For example, to disable: game.Workspace.SpawnPoint.Enabled = false. To enable: game.Workspace.SpawnPoint.Enabled = true. This allows for dynamic control over which spawn points are active during different game phases or events, offering flexible game design.
Why are my players not spawning at the correct location?
Players not spawning correctly often indicates an issue with the SpawnPoint's configuration or environment. Verify that the SpawnPoint's "Enabled" property is true and that it's not obstructed by other parts. Check for script errors that might override default spawning behavior, and ensure TeamColors are correctly matched if using team-specific spawns.
Learn Roblox SpawnPoint basics, customize spawn locations, implement team-specific spawns, troubleshoot common issues, and optimize respawn mechanics for better game flow in Roblox Studio.
35
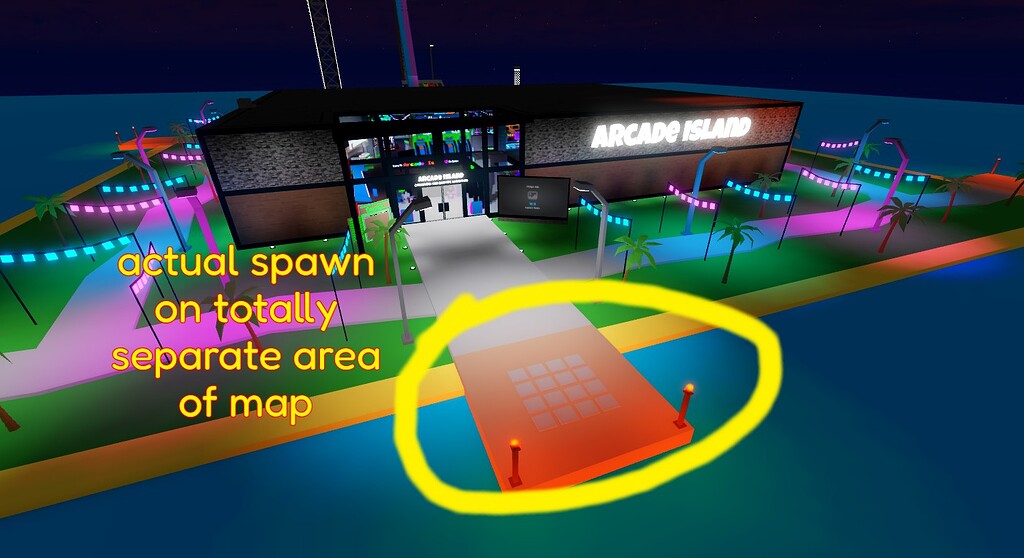


JETPACK RELOCATEDD NEW 2026 Jetpack Spawnpoint Location Jailbreak . Character Randomly Spawns At Fixed Point Of Map Instead Of On A 2 1024x558 . Contoh Roblox Scripts 2026 Panduan Lengkap Untuk Pemula Jurnal Ngawi 3789630207 . Decoding The Roblox Spawn Point Logo A Gamers Guide . HOW TO MAKE A SPAWN POINT 2025 ROBLOX STUDIO TUTORIAL WORKING YouTube

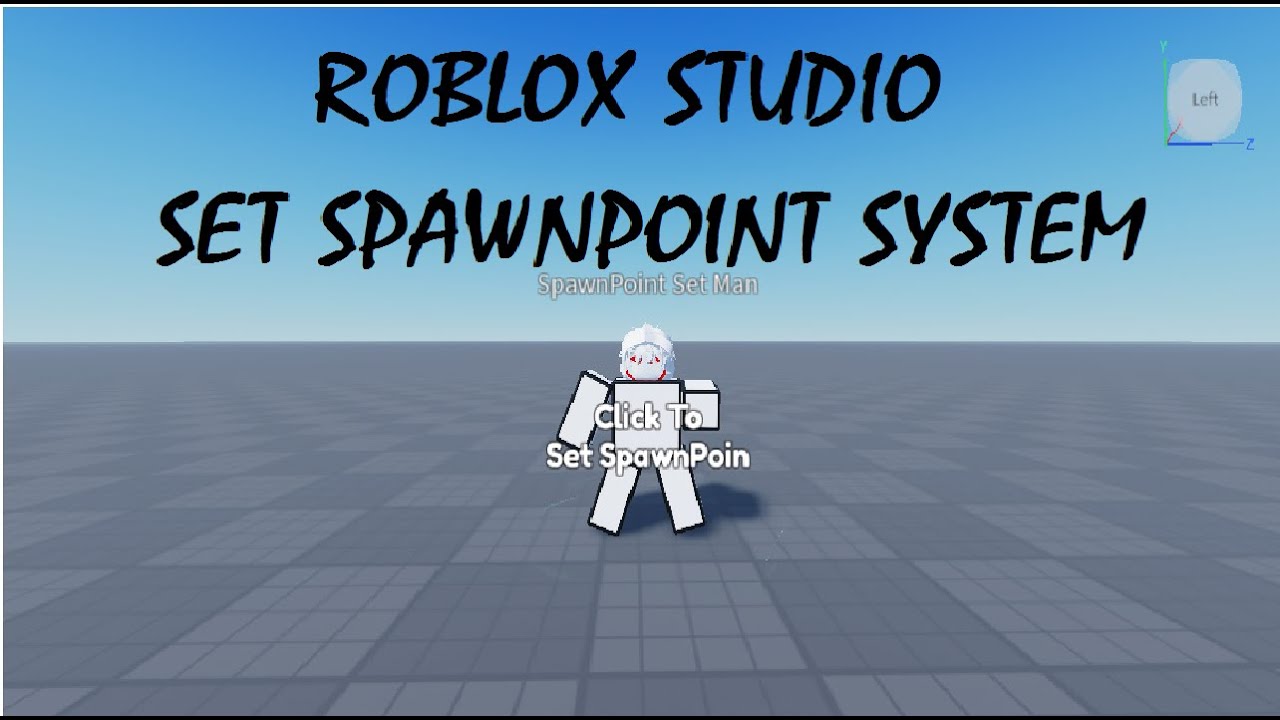

How To Add MULTIPLE Spawn Points Roblox Studio YouTube . Roblox Studio How To Make Set SpawnPoint System Give Away Model . How To Spawn Parts With Scripts Roblox Studio Tutorial YouTube . How To Use Spawn Points In Roblox Studio YouTube . 2026 Roblox Studio Models Guide What To Use Avoid And Why It Matters O


Player Spawnpoints Not Working Scripting Support Developer Forum . Steal A Brainrot Spawner Script OFFICIAL Trax Spawner No Key Steal A Brainrot Spawner Script Screenshot 2. Spawn Point Roblox Studio Roblox Game Spawn Point IHOXZJ . How To Create Spawn Points In ROBLOX Studio YouTube . How To Set Spawn Point In The Depths In Fisch Roblox YouTube


To Roblox Studio Roblox Creator New Template With Spawn Location . Campfire Spawnpoint Scripting Support Developer Forum Roblox 2 690x340 . Roblox Studio Creating A Spawn Point YouTube . How Do I Make Random Spawn Points Scripting Support Developer . Campfire Spawnpoint Scripting Support Developer Forum Roblox


Learn Roblox Studio Learn Roblox Game Development Blog Roblox Guide 38 480x339 . Decoding The Roblox Spawn Point Logo A Gamers Guide TeamBSpawn . Where To Buy Roblox Assets In 2026 What Developers Actually Use And Why O . Roblox Task Spawn Your Ultimate Guide Spawnadded . Campfire Spawnpoint Scripting Support Developer Forum Roblox


Campfire Spawnpoint Scripting Support Developer Forum Roblox . How Do I Make Random Spawn Points Scripting Support Developer 2 517x282 . Classic Spawnpoint Roblox NoFilter. Spawn Point Expression Roblox Item Rolimon S NoFilter. Spawn Roblox


Roblox Spawnpoint Beadwork Design Tutorial TikTok Img. Decoding The Roblox Spawn Point Logo A Gamers Guide . Roblox Spawn Script YouTube . Spawnpoint Interactive Roblox Png. The SpawnPoint Power Roblox 3D Animation YouTube Hqdefault